Wednesday, September 30, 2009
Contents of A Template
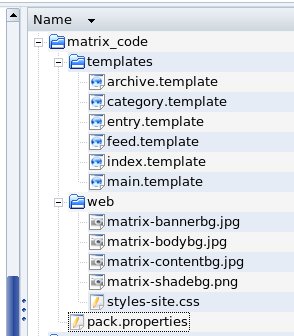
Just for grins I thought that I would provide a picture of the files
contained in a Thingamablog template. So I unzipped the "matrix_code"
tempate into a local directory, then opened up the directories in my
file browser. Here is a screenshot:

Contents of a Template
Of course, the images in the web folder will be different depending on
the particular template. To create a new template, I copied a tree such
as this and modified the six .template files, the styles-site.css, and
the pack.properties files. I have put my own images in place of the ones
in this template.
Sunday, September 27, 2009
New Bio Page
I created a bio page to go along with this blog. It is a separate page
from the blog so that I can refer to it from several different blogs
without having to create it again.
In fact, as I continued editing the page, it became apparent that I was
repeating many things that were already on my home page but in a
different format. So I just turned the bio page into my new home page
and that is that. You can see it here
My New Home Page
The look of that home page will be similar to the look of my new blog
template.
There are several things that must be included in a zip file to make an
installable Thingamablog template.
-
A "template" folder with all the template files in it
-
A "web" folder that has all the images I need plus the stylesheet,
styles-site.css
-
A file called "pack.properties" which has information about the
template, such as name and creation date.
The pack.properties file looks like this:
#
#Sun Sep 27 14:18:15 EDT 2009
author=thekimerers.com
description=A template set custom created to use with the NHAT blog
title=NHAT
created=1254075498000
The number at the "created" line is just the creation time specified as
the number of milliseconds since Jan 1, 1970, which is the standard way
that Java keeps track of time.
The template files that are required are:
-
archive.template
-
category.template
-
entry.template
-
feed.template
-
index.template
-
main.template
The template files are just html files that call out the stylesheet ID's
and classes plus the custom Thingamablog tags that are replaced with the
blog contents.
To get started on creating my new template I did the following:
-
I created a new blog that is posted locally to my disk for testing.
-
I copied an existing template to modify (I don't really want to start
from scratch) into a new directory
-
I modifed the template files in the test directory on my disk.
-
Incrementally made changes and reviewed the results.
In order to see the results of my changes to my template I have to jump
through some hoops. Here are the steps I have to take.
-
Change the .css file or the template files
-
Zip the required files into a template zip file
-
Copy the zip file into the directory of templates where Thingamablog
is stored (to install it).
-
Open Thingamablog and then open the properties sheet for the blog.
-
Change the template for the blog to any other template.
-
Close the properties sheet.
-
Open the properties sheet again and reselect my new template. This
causes the template to be refreshed.
-
Publish the blog.
-
Refresh the blob page in the browser to see the new output.
I am basically creating the new template, installing it, and refreshing
the entire blog with the new version.
That is a real pain. So I came up with a way to get some more immediate
feedback.
I created a "test" directory in my sandbox. Then I copied the following
things into it
-
main.template
-
styles-site.css
-
nhat-bodybg.jpg - the background image
I changed the name of the template file to "main.html". Now I can view
the template in place and see the effects of the changes to the .css by
simply reloading the main.html file in the browser. Of course, there is
no content in the "blog" page, and what I see in place of the content is
the Thingamablog custom tags, <$tag$>. But that is OK because I am only
looking at the format for the style sheet and the template anyway. Once
I get it like I want it I will go through the steps above to see what it
looks like with content in it.
Saturday, September 26, 2009
Start With a Background Image
I have started designing a new Thingamablog template for my next blog(s).
One thing I like to do on my web pages is to have a nice, relaxing
background throughout. I think that looks better than having a solid
background or a bunch of complex graphics. So I have found a nice tile,
which looks like parchment. I have adjusted the brightness of the image
using The GIMP so that the background is less intrusive than it would be
if it were darker. Here is the tile:

Before moving on to the use of the tile, I want to address (once again)
how images get added to a blog.
Adding an image like the one above to the blog is somewhat tricky if you
try to get too smart about it. I imported my background image into the
media folder, which will cause it to be automatically uploaded by
Thingamablog, and that was easy. The tricky part is how the image is
made accessible to the blog out on the web.
When I use the image tool to put the image into the blog, I navigate to
the file on my disk drive and the tool puts the URL of the file
into the html. This, of course, will not be accessible out on the web
even after the image has been uploaded. However, if I leave the file:
specification in the blog text, the uploader in Thingamablog will
automatically translate the file: URL into the appropriate http://
URL. I did not understand that before, and I mucked around with the
image URL until I broke it.
The fact is that Thingamablog handles the image URL's quite nicely if
you let it.
Right after I add the image with the editor, when I look at the html, it
has the file URL pointing to the image on my disk. For example:
<img src="file:/home/brian/blogsdatabase/1247882990333/web/media/parchment-30.jpg"
height="265" width="300">
After I publish the blog to the web, the uploader translates the file:
URL in the blog text to the appropriate, fully qualified http://
URL and publishes that text instead. Hence, the image will work fine on
the blog. It actually changes the text in the blog. After publishing,
the above img tag looks like this in the html editor:
<img alt="Parchment Tile" src="http://www.thekimerers.com/brian/blogs/TAMB/media/parchment-30.jpg"
height="265" width="300";>
So, as long as you use the tools in the editor to add imported images,
and you don't mess around with the URL's in the html editor, it all
works out just fine when you publish. I have touched on this problem
with the image URL's before, and I fixed it back then by manually
correcting the URL and uploading the blog again. I have now figured out
how to use the Thingamablog editor properly, and I just let Thingamablog
do the grunt work for me. The secret is:
-
Import the images into the media folder
-
Enter the image into the blog using the image tool (not using the html
editor)
-
Don't muck with the URL until after you have published the blog.
Well, I got off the subject a bit. But I do have the background image
for my new template. Next I think I will enhance the blog by creating a
bio page to see how the background image works in actual use. Once I
have the bio page done it will reside outside of the blog so that I can
use it for any of my future blogs.
Sunday, September 20, 2009
Back In The Saddle
It has been a long time since I blogged. I have been very busy finishing
other projects. Now I am ready to begin using Thingamablog again. My
intention is to create a new theme for Thingamablog and post the details
here. For now, I will summarize what I know about the structure of a
theme.
It appears that in Thingamablog a theme consists of three basic parts:
-
The style sheet, styles-site.css
-
The six templates in html
-
The special tags implemented by Thingamablog
Each component of the theme contributes its own, distinct features to
the theme (although there is some crosstalk).
styles-site.css
Like any style sheet, this one supplies fonts and colors and sizes etc.
There is some crosstalk between this file and the templates because it
specifies some locations as well. That caused me some difficulties when
I tried to customize the Thingamablog theme used on this blog, so I will
have to look into that. I replaced some of the style sheet positioning
by using tables in the templates.
The effects of the style sheet are handled by the browser when the page
is displayed.
Templates
The templates specify the locations of things, such as headers and
footers and content areas. The templates use the style sheet classes and
id's to specify where things go. They also specify the positions of the
blog data by using the special Thingamablog tags where the content of
the blog is supposed to appear.
Thingamablog Tags
These tags are implemented in the Thingamablog program and know how to
pull the content data out of the database.
When creating an entry in the blog, the information about the entry,
such as the text that is typed into the entry and the dates and times,
is entered into the database. When you publish the blog, the contents of
the entry are pulled out of the database and written into the .html
files in the positions indicated by the placement of the tags in the
templates. The .html files are then uploaded to the server.
The reason for having a database is that the same information is
published in more than one place. For example, the text of the entry is
published in the main page, the category pages, the archive pages, the
feed page, and the individual entry pages. A single copy of the text is
kept in the database, and is written into various .html files before
uploading to the server.
Since Thingamablog is a client side blog tool, all of the files are
created statically on the local computer and then uploaded to the
server. The online blogging tools use the same sort of technology, but
the database exists out on the server, and the .html can be created
dynamically by the server and sent directly to the browsers upon
request. They do not have to actually create the .html files, although
some of them do.
The Custom Tags are simply Basic tags (which contain static text) in
which you can specify the contents of the tag. The semantics of the
custom tag are the same as for the built-in Thingamablog Basic tags -
you specify where the tag contents go by calling out the custom tag in
the template.
I am hoping to unravel the details of how the Thingamablog themes work
so that I can create an entirely new one for another blog.
As ye fool around, so shall ye learn.
Wednesday, September 02, 2009
Back from Vacation
I just got back from a week in Maine. It was a glorious vacation, but no
activity here on the blog.
Soon I will try to post some details about how to customize and/or
create a new template for Thingamablog.
Right now, it is late so I am going to bed.
This site and all of its contents are copyright Brian S. Kimerer 2009
| 
